
The thought of making my own yogurt had never crossed my mind until I stumbled across this NPR article several months ago. Huh, all I need is live yogurt cultures (from store bought yogurt), milk, and kitchen tools/appliances that I already owned. I am all about home cooking and knowing what goes into your food, so I decided to give it a try.
Disclaimer: This post contains affiliate links, which means I may receive compensation if you make a purchase through these links. There is no cost to you. See my Disclosure Policy for more information.
My quick feedback: pros are it is easy and inexpensive. Con it takes time, but most of the time is hands-off time!
Supplies and ingredients
- yogurt (I use 4-6 ounces per gallon of milk; my choice for a starter is Dannon All Natural Plain Nonfat Yogurt or a plain greek yogurt)
- milk of your choice (skim, 1%, 2%, whole, even almond and coconut are supposed to work! I have only used skim and 1% cow’s milk),
- Stove
- Oven, dehydrator, or large cooler
- pot large enough to hold the volume of milk you’ve chosen to turn into yogurt
- sealing jar(s) for “cooking” the yogurt (I choose to use 1.5 to 2 cup mason jars so I can portion the yogurt before cooking. That way, when I want to east some, I do not risk contaminating the whole batch and killing my yogurt culture)
- whisk, fork, or blender
- Cooking thermometer the reads between 100 and 175 degrees. I like my Oneida digital thermometer – it has an alarm to alert me when the desired temperature is reached, when temperature is increasing (does not work on the cool-down)
- large watertight container to fit the pot. I use my sink.
- water (and optional ice/ice packs) for cooling the pot of milk
- helpful: funnel that fits your “cooking” container
- helpful: ladle or measuring cup/cup with handle to scoop yogurt into containers
- optional: sweetener of choice. I use pure stevia powder
Instructions
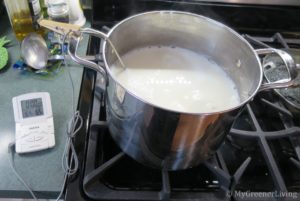
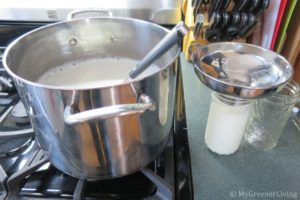
- Pour milk into large pot. Insert thermometer into milk and attach to pot if possible. I have a digital thermometer with a long cord. I use a clothes pin to clip the cord to the pot handle, which holds the thermometer probe in the pot of milk, away from the side. Heat the milk over low-medium heat until it reaches 170 degrees Fahrenheit, stirring periodically. Immediately remove from heat. Notes: Low heat will take a lot longer to reach 170 degrees, but is less likely for the milk to burn onto the pan. Medium heat will achieve the desired temperature faster (30-45 minutes on my stove), but the milk will burn onto the bottom of the pot a little. Not a problem, but a pain to clean.
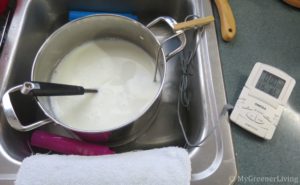
cooking the milk - Place the pot of hot milk into a watertight container filled with water. I put the pot in my sink, fill the sink with water to the height of the milk in the pot, and place several ice packs in the water. Stirring frequently, cool the milk to 115 degrees Fahrenheit.
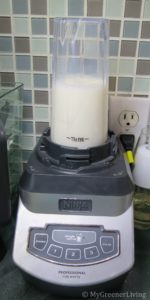
cooling the milk - After the milk cools to 115 degrees Fahrenheit, take the pot out of the cold water. Combine your starter yogurt with about a cup of warm milk an mix well using a fork, whisk, or small blender (I am lazy and love using the single serving cup of my Ninja). Pour the milk-yogurt mixture into the pot of warm milk and stir well. If you’re sweetening your yogurt you can add it to the large pot now, and stir, or add to the individual jars if you’re portioning.
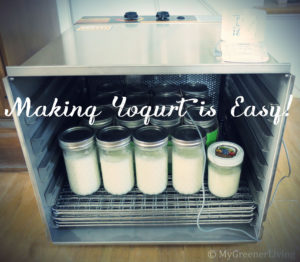
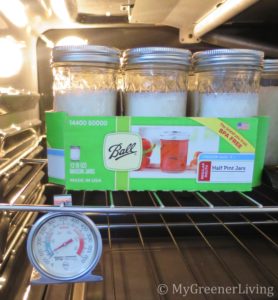
blending the starter yogurt with heated milk - If “cooking” yogurt in the oven, preheat your oven to the lowest setting. Turn it off before it reaches temperature. You’re aiming for about 110-115 degrees Fahrenheit. I have a thermometer inside the oven that helps me regulate the temperature. If “cooking” yogurt in a large cooler, heat water to 110 degrees and pour into cooler. If “cooking” your yogurt in a dehydrator, follow turn on to 115 degrees and optionally, set the timer. (I recently purchased this food dehydrator, which I love. Since I haven;t used it much yet, I used my cooking thermometer to verify the internal dehydrator temperature.)
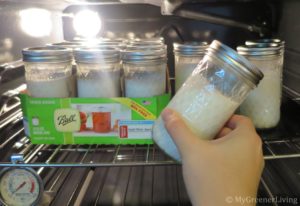
- Pour your yogurt into “cooking” jar(s). I have always used glass, and recommend glass due to its non-reactive nature and tolerance to heat and cold. I use canning jars, a canning jar funnel, and a ladle to portion the yogurt into jars. There is no need to leave air space at the top as I did – I like this extra space for the add-ins that I always put in my yogurt.
portioning the yogurt for “cooking” - Wipe the top of your jar(s) and put the lids on.
- Place the jars in the oven or cooler with hot water and let the yogurt “cook”for 4-12 hours. The longer the yogurt “cooks”, the more tart it will taste – more like Greek yogurt flavor. I prefer to cook my yogurt for 10-12 hours (the dehydrator comes in handy here) – it results in a thicker yogurt, consistency similar to store bought yogurt. When using the oven, I check my oven temperature hourly, and if it’s dropped below 100 degrees Fahrenheit, I turn the oven on briefly (I have a gas oven, so 30-60 seconds, including the time before the burner ignites). This usually boosts the temperature to about 115 degrees, optimal yogurt making temperature.
“cooking” the yogurt 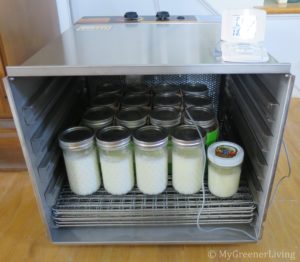
“cooking” the yogurt - a. To check if the yogurt is done, turn the jar at a slight angle. If the milk flows so the top surface is parallel to the floor your yogurt needs more time (or something went wrong). If the top of the yogurt stays in place when you turn the jar, you’re done! You can now put all of the yogurt into the refrigerator, or go to alternate step 8b.
“cooked” yogurt has set 8. b. I soak most of the seeds and grains to remove phytic acid (you can read more about why some people find it desirable to remove phytic acid from their foods before consumption here). While I usually soak with apple cider vinegar as my acidic medium, yogurt works as well. After my yogurt has fully “cooked”, I measure 1 teaspoon of chia seeds and 1 teaspoon of ground flax seeds into each jar, stir enough to moisten the seeds, and return the covered jars to the dehydrator. I keep the temperature between 90 and 100 degrees Fahrenheit, for 6-10 hours.
- Once the yogurt has cooled in the refrigerator, it’s ready to eat! I like to top mine with chia seeds, ground flax seed, cinnamon, fruit, cacao nibs, and a little oats. The flax and chia seeds help thicken the yogurt.
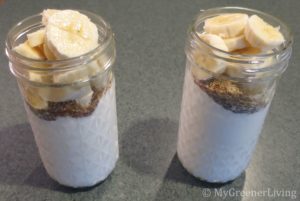
prepared yogurt
I have found that if I use a regular yogurt starter (or some from my last batch), this yogurt is a little thinner than store bought yogurt. When I start with Greek yogurt and “cook” for at least 10 hours, the yogurt comes out thicker. I always add ingredients before eating so this does not bother me. Optionally, you can pour the yogurt into the middle of a large piece of double layer cheese cloth, gather the corners/edges, and gently squeeze or allow to hang to drain the whey.
Make sure to set aside 4-8 ounces of yogurt to be the starter for your next batch! I usually leave this unsweetened.
Tips and troubleshooting
Yogurt lasts at least 3-4 weeks in the fridge. I have not tested longer times, I eat it all within a month.
It is normal to have a little liquid (whey) at the top of the jar, with the majority of the yogurt gelatinous like yogurt usually is. You can dab the top of the jar with a clean dish cloth or paper towel to absorb the excess liquid.
After adding the yogurt, if the milk/liquid yogurt temperature raises higher than 120 degrees Fahrenheit, you’ll kill the yogurt cultures and end up with warm milk, no matter how long you “cook” the yogurt.
Most blogs recommend sterilizing the yogurt jars and all kitchen tools that will come in contact with the yogurt. The risk of not sterilizing is that bacterial that kills yogurt may be in the jars or on the tools. If the yogurt cultures die, no yogurt. I have found sterilizing to be very time consuming and do not do this. Only once in at least 8 batches of yogurt did I have a failure, and I believe it is because I accidentally heated the oven too hot when I was trying to boost the temperature when cooking the yogurt. I think I killed the yogurt with heat, not bacteria.
I love making my own yogurt, because I know exactly what ingredients are in it, and it is much less expensive than store bought yogurt!
Cost
I start with Dannon . The only ingredients are cultured nonfat grade A milk, pectin, and L. Acidophylus – the live yogurt cultures. On sale for $0.50 per 5.3-ounce cup.
I typically use regular 1% milk, $2.79 per gallon at BJ’s. Recently I saw it at Aldi’s for $2.39. Organic milk is about $6.99/gallon in my area – still not a bad price!
My cost for my first 1 gallon of yogurt is $0.50+$2.79=$3.29. I portion this into 16 cups plus about 5 ounces left over for my next batch. Each serving costs me $3.29/16=$0.21.
After I have my starter, each batch is only $2.79, or $2.79/16=$0.1744 (I’ll round up to $0.18 to be conservative) per 8-ounce serving.
If I used organic milk, each serving is only $6.99/16=$0.44 per 8-ounce serving.
Remember, my starter yogurt was $0.50 for 6 ounces, on sale. I’d need just over 21 cartons of Dannon yogurt to equal 1 gallon. 21x$0.50=$10.50.
For each batch after the first, I am saving $10.50-$3.29=$7.21 per gallon of yogurt. Say I only ate a 6-ounce cup of yogurt at a time if I was buying in store, I’d be paying 16x$0.50=$8.00. $8.00-$3.29=$4.71 savings over 16 servings. Assuming I eat yogurt 5 times a week (I usually eat it 5-6 times per week): 5×52=260 servings of yogurt per year. At my cost of $0.18/serving, this costs me $0.18×260=$46.8 per year. If I bought the 6-ounce cups of Dannon yogurt, I’d pay $0.50×260=$130. I save $130-$46.8=$83.20 per year just by making my own yogurt!
Please note, making yogurt does take time. You always need to weight the value of your time versus cost savings. I enjoy being in the kitchen and making my won food. Currently, I am able to make time to make my own food and am able to enjoy monetary savings from doing this, so I keep doing it!