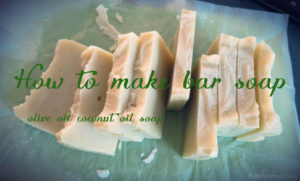
Longer Lasting Bar Soap
I was thrilled with my first batch of homemade bar soap, but found that it was used up more quickly than I expected (or wanted). I set out to make a bar soap that lasted longer than my first batch, but still had the nice lather and silky feel. Longer lasting soap means that the soap bar is harder. I found All About Soap-Making Oils to have some very good high level information about selecting oils for making soap. The Secret to the Absolutely Best Soap Recipe offered suggestions about increasing soap bar hardness, including increasing the ratio of hard to soft oils, and adding sodium lactate. How to Make Handcrafted Soap Harder discussed ratio of hard to soft soaps, using castor oil, decreasing superfat %, adding sodium lactate or salt, all of which can increase the soap bar’s hardness. I haven’t tried sodium lactate or salt in my recipes yet, but plan to in my next batch. I’ll report on that after my experiments!
Disclaimer: This post contains affiliate links, which means I may receive compensation if you make a purchase through these links. There is no cost to you. See my Disclosure Policy for more information.
After doing my research and raiding my closet to see what oils and butters I already had on hand, I went over to soapcalc.net and formulated this bar soap recipe. It is fragrance free, 3% superfat, water as a percent of oils 38%, and I decided to use black tea in place of water. I made this recipe cold process.

Why use tea instead of water in soap making? Maybe some of the antioxidants in the tea survive the soap making process and my skin can benefit from this. Even if not, I experimented with something new, and ended up with interesting colored soap!
This recipe is for a 2 kilogram batch of homemade bar soap. You can adjust the amount of soap you make by keeping the same ratios I have listed, and using soapcalc.net to calculate the amount of water and lye needed.

Black Tea Soap
Ingredients
Ingredients
- 760.00 grams distilled water 26.81 oz or liquid of choice (I brewed tea with 4 black tea bags)
- 290.20 grams Sodium Hydroxide lye (10.24 oz)
- 100 grams Castor Oil 3.53 oz (5% of oil weight)
- 100 grams Cocoa Butter 3.53 oz (5% of oil weight)
- 600 grams Coconut Oil 76 deg (21.16 oz) (30% of oil weight)
- 1200 grams Olive Oil 42.33 oz (60% of oil weight)
Supplies
- immersion blender
- large glass ceramic, or steel container for mixing soap
- glass ceramic, or steel bowls or measuring cups for measuring ingredients
- microwave crock pot, or stove for melting oils
- kitchen scale
- silicone spatula or wooden spoon
- soap mold can be as simple as a box or pringles tube lined with wax paper
- gloves safety glasses
Instructions
- 1. If using tea in place of water, the day before you plan to make soap, brew the tea. Measure slightly more water than needed in your recipe, and heat to a boil. Remove the water from heat and place tea bags in the water. I used 4 regular size tea bags, and let steep for about 1 hour. I wanted dark tea for the color. Remove tea bags, and leave the tea at room temperature, or place in the fridge to chill. From my 2 batches, chilled tea resulted in darker finished product.
- 2. Prepare your soap molds.
- 3. Measure the tea by weight, pouring into a glass, ceramic, or steel vessel. If you do not have enough tea, add distilled water until you reach the desired weight of liquid. Ensure that your tea is room temperature or cooler (see note below).
- 4. Place the container with the tea in a well ventilated area where it will not be disturbed. I use my sink with the nearby window open. Wearing safety glasses and gloves, carefully measure the lye. Slowly pour the lye into the tea and stir gently with a wooden spoon or silicone spatula to dissolve.
- 5. Measure the oils into a large glass, ceramic, or steel container. Heat slowly until the solid oils are fully liquefied. I use the ceramic pot from my crock pot, and heat either in the crock pot on "warm" or "low", or I microwave the pot with oils.
- 6. Carefully pour the lye solution into the oil solution. Using an immersion blender, blend the solution until achieving trace, typically 3-5 minutes. Trace means that all of the lye is fully mixed in with the oils, and is achieved when the solution has a cake batter to pudding-like consistency; when the blender is lifted out of the soap and drizzles on the surface, traces of the drizzles stay on the surface.
- 7. Pour the soap into molds and place somewhere that the molds can be left undisturbed for 24 hours. I have used a closet and my microwave. At this point the lye is still present in the soap, so use care not to touch it.
- 8. After 24 hours, you may test the soap to determine if it has fully saponified. I use the "tongue test" - touch the tip of your tongue to the soap. If you feel a zap - like touching your tongue to a 9 volt battery - the saponification process is not yet complete, and you should leave the soap for several more hours.
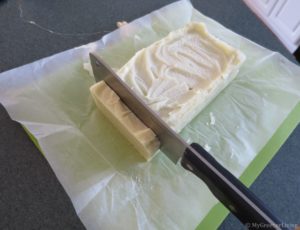
- 9. Remove the soap from molds and cut to your desired size. The soap is still somewhat pliable at this point, so be careful not to make undesired marks with your tools or fingers. You can also use this time to smooth edges on your soap.
- 10. Place the soap bars to dry. I line a large shallow box with waxed paper and stand the bars up on end with space between each bar. Allow the soap to dry at least 6-8 weeks before using. Longer dry times should result in harder soap bars that last longer.
Notes
Ingredients
760.00 grams distilled water (26.81 oz) or liquid of choice (I brewed tea with 4 black tea bags)
290.20 grams Sodium Hydroxide (lye) (10.24 oz)
100 grams Castor Oil (3.53 oz) (5% of oil weight)
100 grams Cocoa Butter (3.53 oz ) (5% of oil weight)
600 grams Coconut Oil, 76 deg (21.16 oz) (30% of oil weight)
1200 grams Olive Oil (42.33 oz) (60% of oil weight)
Supplies
immersion blender
large glass, ceramic, or steel container for mixing soap
glass, ceramic, or steel bowls or measuring cups for measuring ingredients
microwave, crock pot, or stove for melting oils
kitchen scale
silicone spatula or wooden spoon
soap mold (can be as simple as a box or pringles tube lined with wax paper)
gloves, safety glasses
Instructions
- If using tea in place of water, the day before you plan to make soap, brew the tea. Measure slightly more water than needed in your recipe, and heat to a boil. Remove the water from heat and place tea bags in the water. I used 4 regular size tea bags, and let steep for about 1 hour. I wanted dark tea for the color. Remove tea bags, and leave the tea at room temperature, or place in the fridge to chill. From my 2 batches, chilled tea resulted in darker finished product.
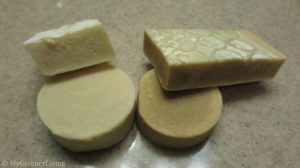
Room temperature tea made the bars on the left, chilled tea made the bars on the right - Prepare your soap molds.
- Measure the tea by weight, pouring into a glass, ceramic, or steel vessel. [Measurement by weight is critical for soap making, to ensure you do not end up with unsaponified lye in your soap. If you don’t have a digital kitchen scale, I personally love and recommend this American Weigh Scales digital kitchen scale.] If you do not have enough tea, add distilled water until you reach the desired weight of liquid. Ensure that your tea is room temperature or cooler (see note below).
- Place the container with the tea in a well ventilated area where it will not be disturbed. I use my sink with the nearby window open. Wearing safety glasses and gloves, carefully measure the lye. Slowly pour the lye into the tea and stir gently with a wooden spoon or silicone spatula to dissolve.
- Measure the oils into a large glass, ceramic, or steel container. Heat slowly until the solid oils are fully liquified. I use the ceramic pot from my crock pot, and heat either in the crock pot on “warm” or “low”, or I microwave the pot with oils.
- Carefully pour the lye solution into the oil solution. Using an immersion blender, blend the solution until achieving trace, typically 3-5 minutes. Trace means that all of the lye is fully mixed in with the oils, and is achieved when the solution has a cake batter to pudding-like consistency; when the blender is lifted out of the soap and drizzles on the surface, traces of the drizzles stay on the surface. I didn’t get any pictures of this, but if you’re unsure if you’re there, read this SoapQueen post.
- Pour the soap into molds and place somewhere that the molds can be left undisturbed for 24 hours. I have used a closet and my microwave. At this point the lye is still present in the soap, so use care not to touch it.
- After 24 hours, you may test the soap to determine if it has fully saponified. Several methods are described here; I use the “tongue test” – touch the tip of your tongue to the soap. If you feel a zap – like touching your tongue to a 9 volt battery – the saponification process is not yet complete, and you should leave the soap for several more hours.
- Remove the soap from molds and cut to your desired size. The soap is still somewhat pliable at this point, so be careful not to make undesired marks with your tools or fingers. You can also use this time to smooth edges on your soap.
- Place the soap bars to dry. I line a large shallow box with waxed paper and stand the bars up on end with space between each bar. Allow the soap to dry at least 6-8 weeks before using. Longer dry times should result in harder soap bars that last longer.
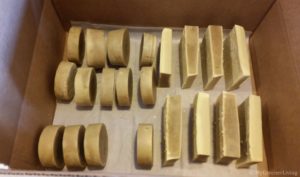
black tea soap drying
Note: If the tea is chilled in the refrigerator before combining with the lye, it will result in a darker bar of soap. If you use room temperature tea, the bar will be a tan color, but lighter than cold tea soap. Please NEVER use hot tea as the reaction of water (or tea, in this case) and lye is exothermic (produces heat), and starting with hot liquid could result in boiling lye-water, increasing the danger of working with lye.
Cost
Castor Oil- $9.49 for 16 fl oz (470.6g) on Amazon. (100g/470.6g)x$9.49=$2.02
Cocoa Butter- $15 for 1 lb (453.59 g) on Amazon. (100g/453.59g)x$15=$3.31
Coconut Oil – $14.99 for 54 oz (1458.99 g) at BJ’s Wholesale Club. (600g/1458.99g)x$14.99=$6.16 (or $16.99 on Amazon)
Olive Oil – $13.99 for 1.82 liters (1688.96 g) at BJ’s Wholesale Club. (1200g/1688.96g)x$13.99=$9.94 (or Amazon)
Distilled water – $0.98 for 1 gallon (3,785.41 grams) at Walmart. (760g/3785.41g)x$0.98=$0.20
Tea Bags – $3.99 for 100 black tea bags at Ocean State Job Lot. (4 tea bags/100 tea bags)x$3.99=$0.16 (Amazon)
Total cost is $21.79 for 2 kilograms or 70.5 ounces. This equates to $0.309 per ounce, or $1.24 for a 4 ounce bar of soap. For comparison, I can get Kirk’s coco castile soap for $3.28 for 3-4oz bars at Walmart, which is $1.09 for a 4 oz bar. A 6 pack of Dove 4 ounce bars is $6.88, or $1.15 per 4 oz bar. This soap costs marginally more, but feels nicer on my skin, and has only high quality, chemical-free ingredients. Well worth the price, to me!
Have you ever made soap? Do you have any favorite recipes?